Developing Fine Motor Skills with Chenille Stem Sculptures


Awhile back, I was once again inspired by 


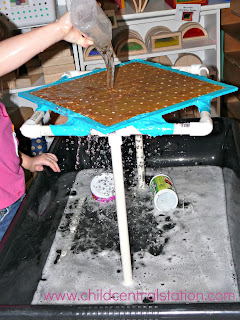
This simple contraption is made with pegboard, pvc pipe and duct tape. It isn't exactly the same as the one that Tom built, but it serves the same purpose. During sensory table play- It gives the children another level to play- and all of the holes in the peg board cause whatever substance to fall through.  Hours of great learning fun and exploration! 


When we build contraptions like this- I tend to try to think about as many ways as possible to utilize them. You can change up the material in your sensory table- I bet this would be fabulous with sand- colored rice- I bet you could even squish play dough through it! 


At the UP Early Childhood Conference, I put a big glop of flubber/slime on top of it and let it sit. The stringy ooze was fun to watch and provides a great visual! (Photo courtesy of Lisa Murphy aka The Ooey Gooey Lady)

Most of the slime came off- but some of it hardened in the holes of the apparatus.  So... I thought- what could we put through those holes to open them back up? 

Chenille Stems! (Pipe Cleaners!!!!!)


We didn't use the contraption in the table this time. Instead, I just placed it on the floor with our big bin of chenille stems/pipe cleaners. 


It did not take long for one child to figure out how to put the stems through the holes.... and then another, and another....  until we had a whole group of children concentrating on adding stems to the work of art. 


Some of the children worked hard to try to get the stems to fall straight through to the bottom while others worked to bend them to keep them in place.


Some of the children worked from the top-
Others thought it would be fun to work from the bottom.


Some of our younger friends had a hard time figuring out how to put the stems in.....


 But they sure had fun pulling them out! 

Comments

Tom Bedard said…
Amy, thanks for the shout-out. I like how you speculate about possible uses and how you relate how one idea morphs into another. It sounds to me like how children think and try things out.
You're welcome Tom! I'm always happy to share my inspiration :). Thanks- I'm always trying to think of new ways to use the same things over and to expand not only upon that use, but also to stretch the learning opportunities.

Popular posts from this blog

A Few Ideas With Marker Caps (As Promised)

Yesterday, I hope I convinced you not to throw away your markers that "don't work." Today, I will share with you a few ideas for what to do with all of the caps. The possibilities are nearly endless, but here are a few of our recent creations: 1) A Leprechaun/Fairy Ladder/Rope Ladder: 2) #1 if not permanently secured can also double as a rope bridge: 3) #1/#2 can also be made into a train track for your homemade trains :). (No photo available) 4) You can use them as beads for a necklace: 5) You could make them into a wind chime. (No photo available). 6. You can use them as small manipulatives to count, sort, and make patterns with. (No photo available). 7) You could use them as playing pieces in your own homemade board game. (No photo available). 8) You could put them on a wire and glue them in place to make a twirling whirly-gig. 9) You could top them with a lid from a milk jug to make tiny tables or toadstools. 10) You could make them...

Easter Egg Caterpillars!

OOOPS! This post has moved, please click on the photo to be redirected!

"The Markers Don't Work!"

How may times have you heard, "Ms. (fill your name in here), this marker doesn't work!" I know I hear it all the time. Sometimes it is because our little friends forget to replace the caps, and sometimes the markers have just been "all used up!" What do you do with all those markers that just don't work? Please don't tell me that you throw them out, try this instead: First, sort your markers out. Put the caps in one container ( save those too, I'll show you what you can do with them in tomorrow's post) and the markers in another. I have a box for the markers that "don't work" for the children to place them into every time they run across one. You can also have the children help you test the markers periodically to sort out the ones that need to be removed from the "working set." When it comes time to use "the markers that don't work," we use a small sponge paint roller to roll water onto our card...