Frog Egg (Bubble) Prints


A couple of years ago- I saw this great post from The Chocolate Muffin Tree about bubble prints. When they did this activity, they used colored bubbles.


 I thought, we could try it by coloring our own bubbles with paint. Just so you know, it does take a bit of tinkering to get a good mixture together that will be successful. 


We did attempt a few prints with food coloring in the bubbles- 
and we did make some of our own "bubble" with dish soap. We did find that we have GREAT dishsoap- so great in fact that it was fabulous at taking care of the color we added with the paint or food coloring. Thus- it was not good for making prints...


 However- the best option was to use store bought bubble solution and liquid tempera. (We have since done this with liquid watercolor and food coloring. I would recommend using either of the paints over the food coloring in order to have a nice print)


The children absolutely loved this activity- they were given permission to blow bubbles through their straw! It was fun to make the containers overflow! 
Then, when they have a big enough pile of bubbles......


You gently put a paper down on top of the mountain of bubbles and then pull it off....


You can repeat this as much as you want.... 
and use different shaped containers and different colors!
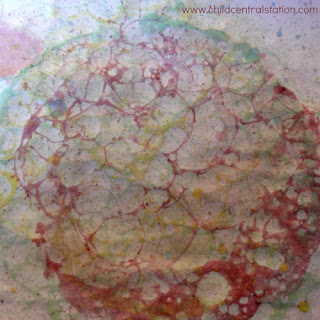
This one has a couple of different colored prints on top of each other,
but see how the edges of the bubbles look like a clump of frog eggs?

When I initially saw this post- I thought it was a brilliant activity for us to try


A few notes/tips if you opt to try this activity:

* Yes, some children may suck in the bubbles instead of blow. All of the materials used are non-toxic. I am not advocating for encouraging tasting, but if it happens, it happens. 

* Some children may only be interested in blowing bubble mounds and not making prints- This is about the process, not the product- let them blow until their hearts are content

* Some children may make so many prints that their papers tear. This too is okay- children need to use too much before they understand how to use just enough. Help them problem solve if they are upset about it. (Freezer paper works well if they intend to continue to make lots of prints..... Putting less prints on the paper, or waiting for the print to dry before adding another one are also common options- but let the children try to figure out a good solution on their own before jumping in to problem solve for them.)

* Joint bubble blowing sessions in giant pans of bubbles are LOTS of fun! 

Comments

Unknown said…
Aaah, we love this activity. If you've got some real littlies who might forget to blow they can squeeze sponges in the painty/soapy mixture to make lots of bubbles- the bubbles are smaller but it's lovely and messy and still great fun!
Bio Bubble Pets said…
Wow! What a cool concept, I will have to show my niece this! BUBBLES!
Angela said…
This looks like something fun my girls would love to do. I just worry about my three year old accidentally drinking through the straw instead of blowing!
jwg said…
If you poke a couple of holes about an inch down from the top (mouth end) of the straws it makes it more difficult to drink.

Popular posts from this blog

Easter Egg Caterpillars!

OOOPS! This post has moved, please click on the photo to be redirected!

My friend died

 I learned a hell of a lot from Dan Hodgins.  He was mentor, a friend, and a "bone shaker" for many of us in the field of Early Childhood Education. He was and will always be a champion for children, and protector of childhood.   I have so many great memories of time spent with him, it just doesn't seem like we had enough time. Dan died this past Saturday.  Interestingly enough, Dan and I talked about death quite a bit. It is one of those topics that isn't talked about all that much in our field, but is super important. All living things eat, all living things poop, and all living things die.  Dan and I recorded a podcast for awhile called "Shaking Bones." Dan was always shaking bones, even before I met him. To say I was honored to be asked to be his co-host would be putting it lightly. I loved recording with him. He was never afraid to touch on topics that were a bit edgy, or issues that sometimes weren't talked about much at all.  We even...

A Few Ideas With Marker Caps (As Promised)

Yesterday, I hope I convinced you not to throw away your markers that "don't work." Today, I will share with you a few ideas for what to do with all of the caps. The possibilities are nearly endless, but here are a few of our recent creations: 1) A Leprechaun/Fairy Ladder/Rope Ladder: 2) #1 if not permanently secured can also double as a rope bridge: 3) #1/#2 can also be made into a train track for your homemade trains :). (No photo available) 4) You can use them as beads for a necklace: 5) You could make them into a wind chime. (No photo available). 6. You can use them as small manipulatives to count, sort, and make patterns with. (No photo available). 7) You could use them as playing pieces in your own homemade board game. (No photo available). 8) You could put them on a wire and glue them in place to make a twirling whirly-gig. 9) You could top them with a lid from a milk jug to make tiny tables or toadstools. 10) You could make them...