
I'm an artist. We all are, some of us have just forgotten what it was like to be three and making masterpieces we couldn't wait to show to mom and dad. I'm a strong advocate of the fact that we are all artists, and it drives me absolutely nuts at how product driven "art" can be in some structured settings. Ask a classroom full of very young children- how may of you are artists? (You'll see almost all of the hands in the air). Do the same of adults, and well, in most circles you are lucky to get a couple of hands. I'm doing what I can in that department as I work with teenagers and adults on finding their inner artists again. Fortunately, on a daily basis I have the wonderful opportunity to let the young children continue to create, and to love the process of art.
There are a few things that I would like to share with you in regard to children's artwork. Please take what you like and leave the rest:
1) Names go on the back. As a parent or teacher, it is more respectful of you to write your child's name on the back of the page they are creating. A name on the front can be distracting and not what the child had in mind for their process or product. Have you ever noticed a child make sure to cover the name you wrote completely??? As children grow and develop, they can then choose to sign their own artwork by placing their name in a place of their own choosing, and it is still their work that shows on the front.
2) "Art" that requires more work from you than it does of the child is not art. The art project is again about the process, and if YOU are doing more than the child, where is the process and experience for the child?
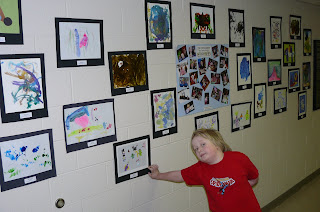
3) When you display children's art, display it with pride. Matting children's art work with card stock, posterboard, or construction paper can turn any process into an amazing looking "product" to show off. I often use poster board and then print labels with the child's name, age, date, meduim, and sometimes title if the child provides one. When displaying in public- consider how adult art work is displayed. It can be expensive to mat and frame all of the children's art work, but you can mat with poster board and laminate quite reasonably.
4) Ask your child questions about their artwork and process. Make statements like: "It looks like you worked hard on that" or "I noticed you spent quite a bit of time painting today" Basic statements like this can get the conversation started. Rather than placing the value on the outcome or the product - an example of a product focused question would be: What is it? You could use questions and statements that allow the child to tell you more about the process. Ask: Can you tell me about this painting/drawing? What did you like about working with (this paint/ the markers/ collage materials)? Do you think you would like to try something like this again? What would you do the same? What would you do different? What do you like best about the experience? (This does not apply when working with very young infants and toddlers- BUT what you can do is talk with them while they are working with materials. For example- with finger painting- talk about what the child is doing and how they are interacting with the medium. "Look at that paint, you are moving it with your fingers. It feels cold and squishy. You are opening and closing your hand. Look at the bright colors. etc" And, yes give infants and toddlers regular art experiences!)
5) Keep art fun! And don't force it. Children will gravitate towards welcoming activities and art processes in their own time on their own terms.
6) Don't have any expections on outcomes. Let the children create and enjoy the process of defining thier own outcomes.
7) Stock your supplies. Again- art is a process, allow children multiple sheets of paper if they want to continue to explore the medium. Let them integrate materials and experiment with mixed mediums.
Keep in mind the process for yourself too. Take some time and drift back to a time when you scribbled on a page and were filled with pride. Make time for art experiences, with no expectations. Explore to find your inner artist again ;).
There are a few things that I would like to share with you in regard to children's artwork. Please take what you like and leave the rest:
1) Names go on the back. As a parent or teacher, it is more respectful of you to write your child's name on the back of the page they are creating. A name on the front can be distracting and not what the child had in mind for their process or product. Have you ever noticed a child make sure to cover the name you wrote completely??? As children grow and develop, they can then choose to sign their own artwork by placing their name in a place of their own choosing, and it is still their work that shows on the front.
2) "Art" that requires more work from you than it does of the child is not art. The art project is again about the process, and if YOU are doing more than the child, where is the process and experience for the child?
3) When you display children's art, display it with pride. Matting children's art work with card stock, posterboard, or construction paper can turn any process into an amazing looking "product" to show off. I often use poster board and then print labels with the child's name, age, date, meduim, and sometimes title if the child provides one. When displaying in public- consider how adult art work is displayed. It can be expensive to mat and frame all of the children's art work, but you can mat with poster board and laminate quite reasonably.

4) Ask your child questions about their artwork and process. Make statements like: "It looks like you worked hard on that" or "I noticed you spent quite a bit of time painting today" Basic statements like this can get the conversation started. Rather than placing the value on the outcome or the product - an example of a product focused question would be: What is it? You could use questions and statements that allow the child to tell you more about the process. Ask: Can you tell me about this painting/drawing? What did you like about working with (this paint/ the markers/ collage materials)? Do you think you would like to try something like this again? What would you do the same? What would you do different? What do you like best about the experience? (This does not apply when working with very young infants and toddlers- BUT what you can do is talk with them while they are working with materials. For example- with finger painting- talk about what the child is doing and how they are interacting with the medium. "Look at that paint, you are moving it with your fingers. It feels cold and squishy. You are opening and closing your hand. Look at the bright colors. etc" And, yes give infants and toddlers regular art experiences!)
5) Keep art fun! And don't force it. Children will gravitate towards welcoming activities and art processes in their own time on their own terms.
6) Don't have any expections on outcomes. Let the children create and enjoy the process of defining thier own outcomes.
7) Stock your supplies. Again- art is a process, allow children multiple sheets of paper if they want to continue to explore the medium. Let them integrate materials and experiment with mixed mediums.
Keep in mind the process for yourself too. Take some time and drift back to a time when you scribbled on a page and were filled with pride. Make time for art experiences, with no expectations. Explore to find your inner artist again ;).
Comments
Leigh