

 I'm giving a brief apology for the lack of posts this month. Life has been insanely crazy. We had a bout of strep throat followed up with a nasty upper respiratory virus. Of course, we weren't sick at the same time. We all took turns, and I think (*hope*) that we are all on the mend and life will go back to normal!
Anyhow, being that I missed last week's post, this week is merged/double post. Today's featured items are baby food jars and containers. (Both the glass jars and the plastic containers).
 We use a number of both types of containers as paint holders. The ones in these photos have been glued to a board that slides onto our paint shelf. It makes for easy storage and removal when the children decide to use the paints. (The glue doesn't look "pretty" but it holds a strong bond- liquid nails.)
We have also used both containers to hold smaller arts and crafts supplies.
With the glass containers, we have painted them to make votive candle holders. (Sadly, I don't have any photos of our cute little creations....)
Here are a few of my finds from the www:

These votive holders are different from the ones we made. (We painted ours) I found them over at Back Stitch Baby. I think the tutorial says bullion cube jars, but they would work out brilliantly with baby food jars too!

Aren't these photo snowglobes adorable! I found the post and tutorial from Lori over at It's the Small Things.

I found this tutorial over at Thrifty Fun. I also remember my aunt making these cool trees when I was younger. She made the version with the lights, but I LOVE the idea of an advent calendar like I found over at Naptime Crafters.

I know there are a lot of other neat ideas out there, so please link them up! I really didn't have much success in finding ideas for the plastic containers, so show me what you've got!
Do you have a great idea or post that you can share using baby food jars or containers? If so, please join in linking up!
Here are the rules:
1) The post MUST use baby food jars or containers
2) The post MUST be family friendly.
There are no other requirements. If you would like, I would love if you linked back to his linky party, but it is not required. I would hope that you will investigate the links shared and visit some of the other blogs, but I'm not imposing any "blog hop/linky" rules. Please, if you do find great ideas and photos... Give credit where credit is due :).
If you have been featured and feel inclined, my featured button is available to grab from the sidebar.
Next week, I will feature my favorite link up and I'll be posting about tissue boxes! Hopefully, I'll be on time!
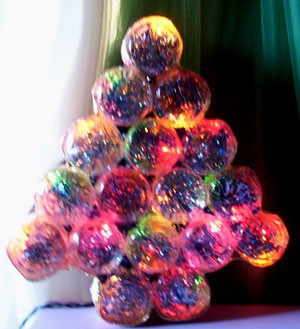
I found this tutorial over at Thrifty Fun. I also remember my aunt making these cool trees when I was younger. She made the version with the lights, but I LOVE the idea of an advent calendar like I found over at Naptime Crafters.
I know there are a lot of other neat ideas out there, so please link them up! I really didn't have much success in finding ideas for the plastic containers, so show me what you've got!
Do you have a great idea or post that you can share using baby food jars or containers? If so, please join in linking up!
Here are the rules:
1) The post MUST use baby food jars or containers
2) The post MUST be family friendly.
There are no other requirements. If you would like, I would love if you linked back to his linky party, but it is not required. I would hope that you will investigate the links shared and visit some of the other blogs, but I'm not imposing any "blog hop/linky" rules. Please, if you do find great ideas and photos... Give credit where credit is due :).
If you have been featured and feel inclined, my featured button is available to grab from the sidebar.
Next week, I will feature my favorite link up and I'll be posting about tissue boxes! Hopefully, I'll be on time!
Comments
I would also suggest that you go to Feedburner and open an accout. Many people (including me) will click on mail subscription if it's available. That's another way to get more followers. And get more readers.