
(If you are looking for What Would You Do With It Wednesday, the post is ready and scheduled for this evening... So, stop back then! I was too excited about this fort fun we have been having to wait to post about it!)
Earlier this week, I installed a hammock. I haven't looked into the regs to see if it can be used for the children during daycare hours yet, and I don't have any special material under it to create a proper "fall zone." I really put the hammock up for Dane and I to use when the other children are not here. However, when the children are here, I can pull the hammock as tight as possible, causing it to create a roof or umbrella shade for the children. I was really excited about having the hammock out- a sure sign of spring/summer, but he children had other ideas for it.....
 In not time at all, the "stage" (Our portable clothes rack with shower curtains) instantly became the door to a fort. All of the sticks from the stick pile were brought close by to help build walls. (We have a HUGE pile that we are saving to make a smaller version of this.)
 A few tires and the old wooden children's picnic table top instantly became a "couch." More tires came shortly after for additional seating because the couch "was too small." It could only hold 2.
Breaks were taken and discussion was had. I peered from outside with my camera- as it was very clear that this was a "no adults allowed" (nor needed) adventure. I stood by and watched as the creativity continued to flow.
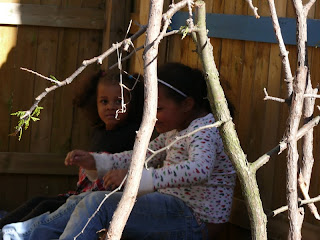
 More branches were added, and I helped to retrieve more supplies when asked. The children worked the sticks and branches into the sides of the
 hammock, I mean roof.

It was becoming more difficult to peer inside of the hidden world they were creating inside.
 The children emerged as Mr. Allan called to us from inside that dinner was ready. I'm not sure that they were completely finished with the project. In fact, I'm quite certain this, like most of our "projects" are a continued work in progress......
 Do you remember how crazy our indoor space became when the children declared Friday to be "Fun Fort Fridays" and then decided that every day was Friday..... I have a feeling that we are about to embark on another long fort building journey.......Dane asked me if we had any extra carpet for their floor out there. I'm going to have to see what other materials I can hunt up for them today! I guess my afternoons of relaxing in the hammock can wait.... at least for a little while. Funny how that tends to happen around here ;).
Earlier this week, I installed a hammock. I haven't looked into the regs to see if it can be used for the children during daycare hours yet, and I don't have any special material under it to create a proper "fall zone." I really put the hammock up for Dane and I to use when the other children are not here. However, when the children are here, I can pull the hammock as tight as possible, causing it to create a roof or umbrella shade for the children. I was really excited about having the hammock out- a sure sign of spring/summer, but he children had other ideas for it.....


Breaks were taken and discussion was had. I peered from outside with my camera- as it was very clear that this was a "no adults allowed" (nor needed) adventure. I stood by and watched as the creativity continued to flow.


It was becoming more difficult to peer inside of the hidden world they were creating inside.


Comments
Abbie- I'm sure I'll have an opportunity at some point :). Right now, it is fun just to watch as they run with it! My parents have a hammock at their place, so if I don't really get to enjoy it here, I know I will there! Having loose parts has been one the best changes we ever made.
Thanks for linking up at Outdoor Play!
Another "must" is a hole. From Scotland we always aim to dig to Australia.
http://ateacheratheart.blogspot.com/