
A Sand and Water Wall :).


 Yesterday, I spent my afternoon working with a little help from Dane to create the start of our sand and water wall. I was first inspired by Jenny over at Let the Children Play who provided ample options for creating waterwalls. I immediately put the waterwall on my long list of things to do.

However, as time passed and I thought about things through our long winter.... I realized that I didn't just want a water wall. We have a HUGE sandbox, and I'd want our wall to be for both sand and water. (And whatever else we decide to use it for!!!!)

I also found a lot of inspiration from Tom over at Sand and Water Tables. Tom encourages the addition of different options to sensory tables. With a little more thought, it became clear that our huge sandbox is really just a big outdoor sensory table. So, with that in mind, combining the ideas and inspiration, our sand and water wall was created.
 We opted to make our wall out of a piece of 4' x 4' plywood, the "true outdoor" kind. This way, we could create our wall and it would be able to withstand the elements for a longer period of time. I really like the idea of pegboard, but unless I wanted to special order the plastic version, I knew that it would not last in our outdoor climate and I really wanted to try to stay away from plastic.

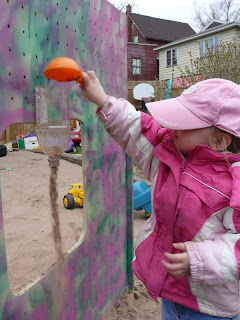
 So, using a piece of peg board as a guide. I marked the spots on our plywood (every other hole from the traditional peg board) and I drilled the holes to create our own peg board. I also decided to put in a rounded square in the middle of the board. This provided a "window" to invite children to utilize the horizontal in addition to the vertical. It also provided a way for children to utilize both sides of the board.  (Initially, I thought about putting this on the fence, but quickly realized how much more potential children would have if they could use all sides.) If you notice, even before we started to add the pieces to it, the children were exploring the "window."
 We are currently using pieces of plastic containers that would have been tossed into the recycle bin.  To anchor them to the wall, we are using wing nuts and bolts/screws.  The reason I decided to use wing nuts and bolts is because I wanted to have something that was sturdy, yet moveable for the children.  I do advocate for the use of tools with children, but I didn't want moving the items to be a huge production.  The use of the wing nuts is still a little bit challenging, but I don't anticipate that it will take long before all of the children become pros!
Dane and I only painted one side of the wall. We thought it would be fun to let everyone else help with painting the other side. (I do anticipate that our wall will end up with all kinds of different layers of paint as our little friends do love to paint!)

In the first day of exploration, the children used the wall as a prop to place a long piece of guttering on and sent the sand and dinosaurs down a slide. 
When they weren't tall enough to reach, a little bit of teamwork and a tire provided the boost they needed to reach the top! (You've gotta love all of those loose parts!)
After filling the gutter, I mean slide up with sand, they opted to try a few things on the wall.....

For our first set of options, I purposely chose the items that are more translucent. However, after only having a few items ready to go... The children are already thinking and discussing what might also work on the wall.


Now... when Mother Nature decides to really send spring/summer our way, our wall will be great for water exploration too.... However, it doesn't look like today is the day. I saw snowflakes in the air as we were out exploring......

Comments

Snowflakes? Oh my goodness! It looks like your kids have a lot of sandbox fun ahead of them.This is wonderful, and I love how you interpreted these ideas to match your space. The way they're moving the sand through the waterfall of containers reminds me of a marble run. I hope you get some warm weather soon.
Play for Life said…
I LOVE it Amy. Our water wall/marble run was the most popular project our children made last year and I can say with confidence that it was played with just about every day!
Donna :) :)
Yes Rachelle- Snowflakes in the air today. Fortunately, right now, they are not sticking to the ground. However, I am told that they are a couple of hours northwest of here. **crosses fingers** Hoping any major snow stays away! I'm sure we will be using the wall as a marble run, sand, water, rock run.... and who knows what else. I'm also very excited (as I mentioned on Facebook) to try out the puppets outside! Some of the children noticed how the big hole made a great puppet stage!

Donna- thanks! I am guessing that our wall will be quite a hit all year long. It will be more challenging in the snow, but warm colored water dripping down onto the white snow will probably be a fun activity for awhile too. And I bet we could get snowballs to make a run kind of like marbles. The children are already on the look out for other items that might be of great use for the wall!
Unknown said…
Love this! Thanks for taking the time to document such a lovely, child-perfect idea!
Unknown said…
wow! This looks awesome! I love the fact that you put the window in it- there are so many different ways to use that!
StrongStart said…
Wow, very inspiring. You combined different elements from others to make your very own design - well done.
Great idea to put it in the middle of your (very large) sand box.
Melanie said…
I love it! I too have had one on my list for a long time. I'd also like to do a free-standing one like yours. How did you get it to stand up/not tip? What kind of reinforcements do you have underground? Anything special? How deep? Thanks!! I'm inspired!!
Thanks!

@Maureen, I love to find inspiration and combine ideas to make something that fits for "us."

@Melanie, I bought some stakes to anchor the wall in. If you look closely in the photo, you will see that I used 4 of them. They extend 18" below the wall. I'm not sure what to call them other than wooden stakes. We bought them at Menards in a bundle of 6. When we installed it in the sandbox, We used a sledge hammer to drive it into the ground. I'm sure we will have to continue to monitor it to make sure that it is sufficient. I also didn't bring the level out to see if we put it in perfectly, but that's okay.. It works and it doesn't appear to be leaning. I figured with the stakes, if we didn't like where it is or if it ever gets to a point where we aren't using it, removal will be pretty easy.
Teacher Tom said…
Very cool, Amy! Our space in the past has been very limited so we've been going with lots of temporary installations, but starting next year we're going to have a much larger space. We will definitely be taking inspiration from this!

I like the wing nut idea. Any thoughts on using zip ties? Our kids really love using them to attach things to our peg board water wall.
Tom Bedard said…
Amy, thanks for mentioning my blog. The beauty of your apparatus to me is that it looks nothing like anything I have built. You took an idea and made it your own. Your idea in turn with inspire other ideas. That is a wonderfully generative process---much like children inviting each other to play
Yelena said…
Amy, this is super cool and oh so timely for me. I've been collecting ideas for water walls, but this is probably the easiest for me to implement since I have everything for it already. Ok, so now I have something to keep me busy this weekend, lol!
Unknown said…
This turned out really good!
Stacy of KSW said…
Amy, this is really fantastic. I also keep a long list of ideas for the backyard and this one is headed to the top of my list!
Perfect in everyway. Can you come over here and make one for me?!

Popular posts from this blog

What Would You Do With It? Wednesday #4, Cardboard Tubes (Toilet Paper, Paper Towel, etc)

Welcome to this week's edition of What Would You Do With It? Wednesday. This week's item(s) are paper tubes. You most often find them at the end of a roll of toilet paper or paper toweling. I'm having trouble hunting up the photos I was going to post for this, so when I find them, I will add them. We have made: rain sticks kaleidoscopes marble runs and we have also cut the tubes and made them into flowers or snowflakes like these. If you would like to visit and link to some of our previous What Would You Do With It Wednesdays, please click here.

Yes, WE CLIMB UP THE SLIDE!

Yes, we do climb up the slide. We climb up the slide here at Child Central Station in the backyard... We climb up the slides when we are at the park..... and here are a few reasons why we think you could reconsider climbing up and allowing the children in your care to climb up the slide too! 1. Climbing up the Slide uses MUSCLE!  Young children need to be active and climbing up the slide requires a lot of muscle and coordination. It is not an easy feat- and requires strength, concentration, determination, and will power. 2. Climbing up the Slide is RISKY! Yes- climbing up the slide is potentially risky, but so is sliding down! Your job as a caregiver is to carefully observe and monitor the situation, to be close by- but not to interfere unless necessary. Part of a child's learning process must include managing risks- climbing up the slide is a perfect way to practice this skill. 3. Climbing up the Slide involves potential CONFLICT! It is al

Making Moon Mud!

We usually make our moon sand with cornstarch , sand, and baby oil. However a blog reader commented that when they make their moon sand- they use water instead of oil.  So, of course, my first thought was- why make moon sand when you could make MOON MUD?  And so you have it- our homemade moon mud! Basically, it ends up being a sandy- runny oobleck! It acts kind of like a solid- and kind of like a liquid..... Now, I'm sure I will get all kinds of questions on the exact recipe and proportions to make this stuff.....  The truth is, we rarely measure. We just mix it up until it looks and feels about right! Today, we made ours with too much water. (It was an experiment.) So, we removed some off the top.  After we were done playing in the mud- we let it sit. A little bit more of the water evaporated while we napped.... Then, this afternoon- It was perfect! Hard as a rock on the bottom, until you dig into grab it... Then....