Making Animal Tracks


One of the topics that always tends to be of interest to the children in our care is animals. I know that part of that is influenced by my son who has been an animal lover all of his life. (Our family vacations are often planned around his research of what animal can be seen where.) Another big factor in this is that we have a number of classroom pets and spend time observing and learning about the critters in our care and neighborhood. We currently have a dog, a turtle, and a bearded dragon.

This summer, under the guidance of one of our interns, the children spent some additional time exploring various aspects of animals. One of the areas they investigated were the tracks/prints that different animals make. To help look at some of the similarities and differences, we opted to make some prints with our plastic animals. 


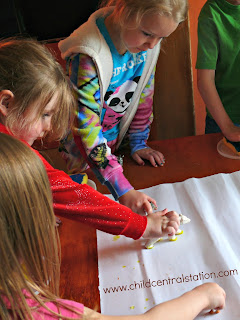
To set this up, I put a sponge out on a plastic lid and then added the paint to a sponge. In the past, we have just used a puddle of paint for the children to dip the critters in. I have found that using the sponge keeps the critters feet from grabbing too much paint and allows for a cleaner, more "crisp" print of the animal's feet. 


 The children had the opportunity to choose a couple of critters to bring to the table. We have a HUGE selection of wild and domestic animals for the children to choose from. It was fun to observe them as they made tracks on the shared paper.  Some of the animals were having trouble sharing the same space, and it was clear that the children knew a little bit about the food chain.


The children had so much fun making the giant masterpiece of prints! They also had fun trying to guess which animal made which print. Can you tell which animals were used?


After they were done with the giant collaboration- they took some time to make some prints on smaller pieces of paper that they could take home too!


Have you ever made animal prints? I'd love to hear about it!

Comments

Popular posts from this blog

A Few Ideas With Marker Caps (As Promised)

Yesterday, I hope I convinced you not to throw away your markers that "don't work." Today, I will share with you a few ideas for what to do with all of the caps. The possibilities are nearly endless, but here are a few of our recent creations: 1) A Leprechaun/Fairy Ladder/Rope Ladder: 2) #1 if not permanently secured can also double as a rope bridge: 3) #1/#2 can also be made into a train track for your homemade trains :). (No photo available) 4) You can use them as beads for a necklace: 5) You could make them into a wind chime. (No photo available). 6. You can use them as small manipulatives to count, sort, and make patterns with. (No photo available). 7) You could use them as playing pieces in your own homemade board game. (No photo available). 8) You could put them on a wire and glue them in place to make a twirling whirly-gig. 9) You could top them with a lid from a milk jug to make tiny tables or toadstools. 10) You could make them...

Easter Egg Caterpillars!

OOOPS! This post has moved, please click on the photo to be redirected!

Santa's Dead

"LOOK! It's Santa!" I exclaimed in my best impression of elf as I noticed a child putting on a Santa suit. "I'm not SANTA! I'm -------" "Oh, I thought you were Santa." "No, Santa's dead. I guess I have to deliver the presents now" (with a deep sigh) "Santa's dead?? What happened?" "Yeah, Santa's dead. It's a long story" and.. just like that he skipped off to play.  Clearly the story was too long to tell, and he had other things that were more important to do than to share it with me.  Many programs are looking at the calendar and providing materials and lesson plans revolving around spring and Easter. We tend not to look too closely at the calendar and instead follow the lead of the children. We have many holiday related materials available to the children, but they are available year round. On any given day of the year you will most likely find a child dressed up as Santa (in fact...